
Section 508
How to make a PDF Accessible
Accessibility Design • Design Thinking • Digital Design • Graphic Design • Interaction Design • Layout Design • Manual Design • Section 508
Project Scope
Project Goals & Objectives
To create a 508 Compliance Manual. To educate the reader on what Section 508 is. To train the reader on how to create an accessible PDF. To enable Designers, Communication Specialists & Writers to know the standards of USAID.
Project Requirements
Must be straightforward. Must be able to be used by anyone, not just USAID staff.
Project Scope Description
Research, Tutorial Document Creation, Alternative Text Document Creation, Demo, Screenshot creation from Demo, Manual Implementation, Testing, Proof Reading, Final Manual.
Project Exclusions
Inclusions: Section 508 principles. Image examples of the steps and instructions.
Exclusions: None
Project Constraints
Time: Within 2 weeks (10 business days)
Money: Payment per day. Payment is guaranteed.
Scope: All deliverables are available.
Resources: All resources are available.
Risks: None
Project Assumptions
This project would be completed in time since creating Section 508 Complaint documents is second nature.
Project Deliverables
508 Compliance Manual (PDF), Tutorial Document (PDF), Alternative Text (Word), Completed Tutorial Document (PDF)
What is Section 508 (508 Compliance)?
It is a law developed by the United States government to make electronics and information technology accessible to people with disabilities. To learn more about this law, read the GSA Section 508 article here.
The Law was named “508 Compliance” to emphasize the need for compliance with the amendments made in 1998 to the Rehabilitation Act section. To learn more, read the discussion on his law by the United States Access Board here.
By law, all United States Agencies including the United States Agency of International Development (USAID) are required to make government information available to all, including people with disabilities.
Finally, there are numerous accessibilities that can be created on an electronic or information technology, “508 Compliance” particularly is for reading accessibility on a technological screen or display. An example is creating a pop-up (an alternative text) for someone unable to recognize images on a screen in order to describe what the person is viewing.
What is the purpose of this manual?
To help the reader have a basic understanding of the need for all important documents other than United States Agencies’ documents to be accessible to all.
To guide the reader on how to create a 508 Compliant document with ease.
To help ensure that everyone, irrespective of disability, has equal access to information.
Required technology
To create a comprehensive 508 Compliant Document, Adobe Acrobat Pro DC is used for this tutorial. Do note that you may need a license to activate the features of making a document accessible.
The attached files for the tutorial
This manual has been developed with documents that will help the reader practically understand the concept of 508 Compliance while creating one. You can download the documents here: alternativeText.docx and tutorial.pdf
Steps to create a 508 compliance document
Before you can make a document 508 Compliant, you will need a document that has all the alternative texts of that document as shown in the attached tutorial documents or alternative text to be inputted. This manual will further explain this.
Alternative Text: It is a phrase description of images, tables, charts, logos, and any other elements aside from actual text in a document. These phrases pop up whenever the mouse hovers over that element. Example:

To start the process of creating a 508 Compliant Document, use the attached tutorial files to learn the process.
Step One: Open the files, “alternativeText.docx” and “tutorial.pdf”, note that you will need to open the “tutorial.pdf” using Adobe Acrobat Pro DC
Step Two: In the “tutorial.pdf”, click the “Tools” menu option at the menu bar of Adobe Acrobat. This window should open:
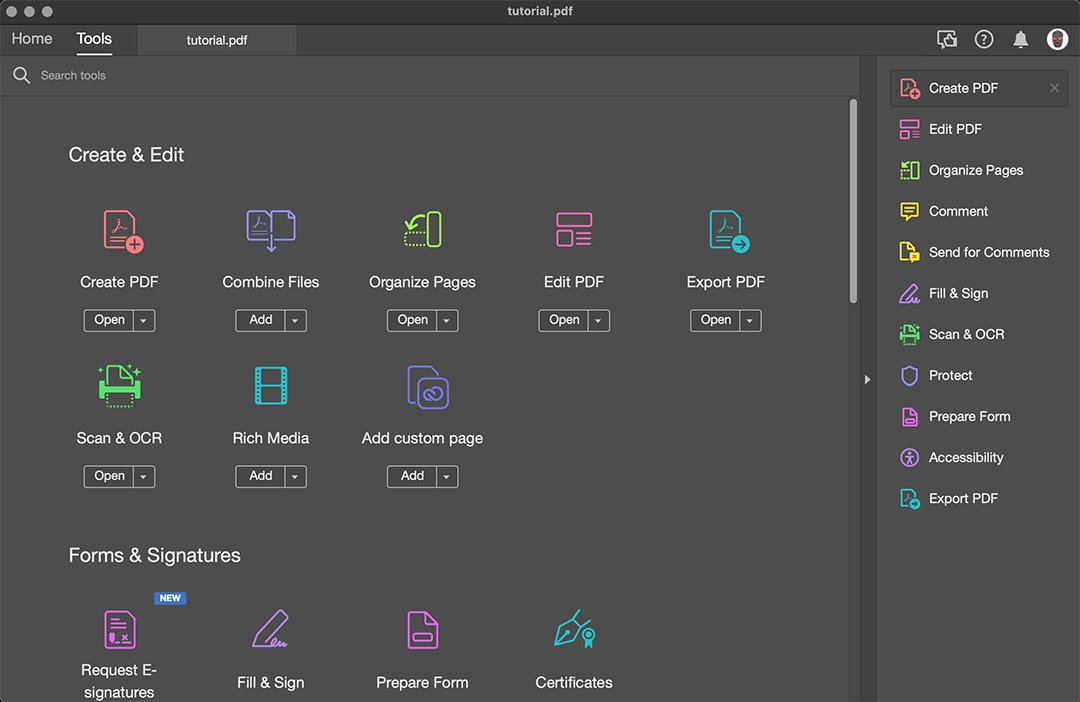
Search for “Action Wizard” or scroll to the bottom of the window to click it.
Step Three: Once you click the “Action Wizard” icon, the window below will appear with a right menu bar appearing (Actions List):

Click the first action, which should be “Make Accessible”
Step Four: Once you click “Make Accessible”, the right menu bar will change as shown below:

Step Five: Click on the blue “Start” button to automate the process, note that you can click on various options listed in the right menu in any order but it is more effective to go through the process guided by the software.
Step Six: After clicking the “Start” button, a popup menu will appear to fill in the Title, Subject, Author, and Keywords. The Title is what you want to name the document as the Subject is the subject matter or theme of the document, the Author is which organization or person wrote, created, or compiled the document, and finally the Keywords are the tags associated with the document to identify and search for the document easily. Fill in the forms and click “Ok”.
Step Seven: After clicking “Ok”, another popup menu will appear, this will be the “Recognize Text – General Settings” this popup is very important as this stage will make images in the document visible by the software.
Please note that the software may not be able to detect all the pictures in the document. Do not worry as we will go an extra step to attach the entire “alternativeText.docx” to the “tutorial.pdf” document.
On this popup menu click the dropdown “Output” and select “Selectable Image (Exact)” then click “Ok” to continue. This option chosen will ensure that the software detects all the elements other than text exactly where the alternative text will be used.

Some software processing will occur after clicking
Step Eight: A menu will pop up after the process is over asking if the document is intended to be filled in, depending on the kind of document you have, select the appropriate option. In most cases especially this one, official documents for reading do not have fill-in sections, so click “No Skip this Step”. You will then select the language of the document, which is “English”. A pop-up will state that Adobe is about to detect all figures with missing alternative text, this is normal, just click “Ok” (This normally happens when you run “Wizard” for the first time). You can stop it from showing the next time by checking the “Do not show this message again” checkbox.
Step Nine: This is the core of 508 Compliance. The popup menu below will appear:

In this section, you will copy and paste the alternative text from the “alternativeText.docx” which you should have opened already from the start of this tutorial. The image that needs the alternative text will be highlighted accordingly in blue. Note that the blue highlight may appear outside of the document, but it will be in line with the image that needs the alternative text.

I suggest you loop through the different elements in the document by clicking the left and right arrows in the document to give you a fair idea of where elements are located ideally. After that, you can copy and paste the different alternative texts per page from the “alternativeText.docx” document.
You will realize that the “alternativeText.docx” document has been organized to correspond with the page numbers of the “tutorial.pdf” document. Feel free to organize it according to your preference. Even more, you can directly type the alternative text you want as you go along. Ideally, it is good practice to get the text from your Communication Specialist, Editor, Script Writer, and the like.
Once you have entered or copied & pasted all the alternative text, click the “Save & Close” button.
Step Ten: A final menu will popup; the “Accessibility Checker Options”. Ensure you select the folder you want the report to be saved in, all the options are checked. Also, check the option to show dialog so you can see what exactly the software is doing. Now click “Start Checking”. The process will run and be complete. Once completed, a left-side menu will appear with the results. You should check through all these results to ensure your document is fully accessible by all.
Step Eleven: At the extreme left side menu, add bookmarks to the document. This function allows you to go to specific points of interest in the document. This makes accessing a particular page easy, rather than clicking through or scrolling through. This is the icon for the bookmark function:

Click the “New bookmark” icon (the same as the bookmark icon but with a plus sign) with the desired page you want bookmarked focus in the Adobe Acrobat DC reader. We will bookmark each page from “Page 1” to “Page 2”. Try it.
To add a bookmark while the desired page is in focus, click the “New bookmark” icon as stated above, hit enter, move to the desired page you want to be bookmarked and repeat the same process. Do this till you have all your desired pages bookmarked. Now you can click on the bookmarks created to switch to the different desired pages.
Step Twelve: Now that you have bookmarked the document, the final step is to attach the “alternativeText.docx” to the “tutorial.pdf” document. This is an extra precaution, as some elements may not be recognized by the software, or individual elements may be recognized as one or vice versa. Attaching the alternative text will ensure an accurate description of the entire document. The attach function is also found at the extreme left side menu, this is how it looks like:

Step Thirteen: Now save your document. You have just created a 508 Compliance Document. Now you can make this document available to all on any electronic or information technology platform or device.
There is a completedTutorial.pdf document to give you a comparison of what you should arrive at when you are completed.
To learn more about PDF Accessibility read the following articles:
Adobe - Creating Accessible PDFs